Setting up ESLint for a Vue.Js Project Using VS Code
Table of Contents
This article first appeared on dev.to on Feb 27, 2019
Introduction
Detecting errors in a dynamically typed language like Javascript can be a difficult task. In this short tutorial we'll look at how we can integrate ESLint into Visual Studio Code to help us lint our code and detect errors.
To better understand the benefits of linting your code consider the following image:
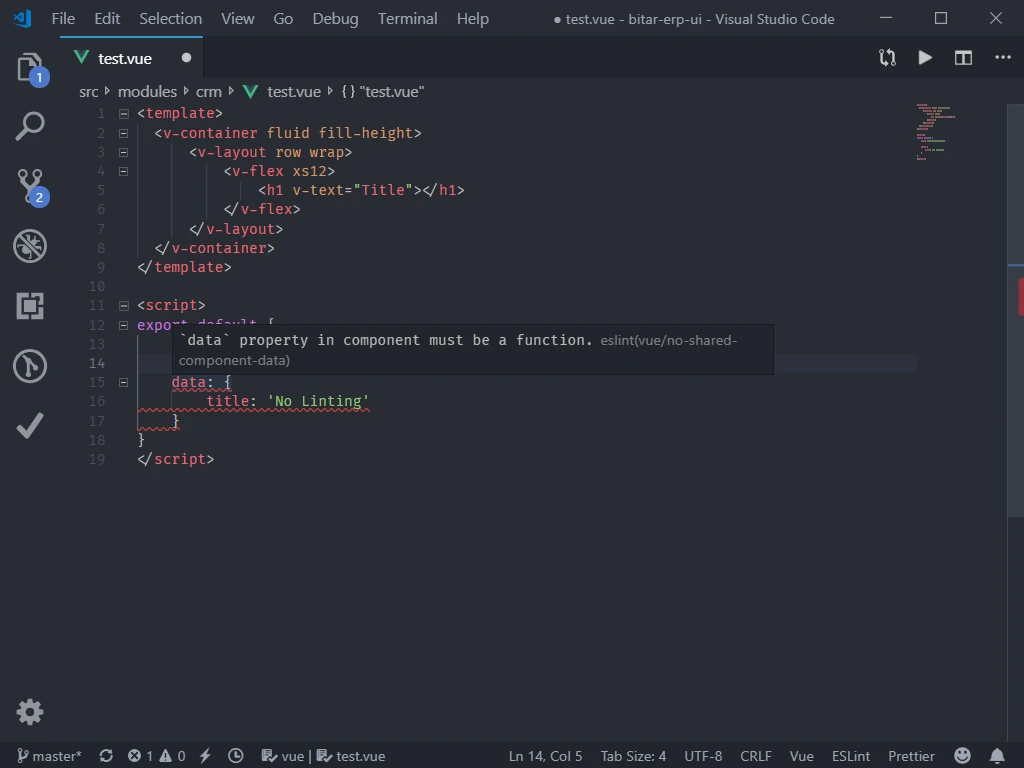
By adding the linter to your editor you can detect such issues as you code and before building and running your application.
Setup
Before we get started make sure that you have the following prepared:
- Visual Studio Code (obviously!)
- A Vue.js project (you can get up and running fast using this tutorial)
Installing Eslint
you can install Eslint and vue specific linting rules into your project by first opening a command line window in your project root and using the following command
npm i -D eslint eslint-plugin-vue babel-eslintor if you're using yarn
yarn add eslint eslint-plugin-vue babel-eslint --devThis will install Eslint into your project's dev dependencies, but it's not usable yet as we need to tell it how we want to lint our project, to do that we can add a special configuration file to our project root, this file can have different names and formats but we'll stick with a simple javascript file.
Add a new file to your project root called .eslintrc.js and add the following code inside it
module.exports = {
  root: true,
  env: {
    // this section will be used to determine which APIs are available to us
    // (i.e are we running in a browser environment or a node.js env)
    node: true,
    browser: true
  },
  parserOptions: {
    parser: "babel-eslint",
    // specifying a module sourcetype prevent eslint from marking import statements as errors
    sourceType: "module"
  },
  extends: [
    // use the recommended rule set for both plain javascript and vue
    "eslint:recommended",
    "plugin:vue/recommended"
  ],
  rules: {
    // we should always disable console logs and debugging in production
    "no-console": process.env.NODE_ENV === "production" ? "error" : "off",
    "no-debugger": process.env.NODE_ENV === "production" ? "error" : "off"
  }
};
After adding the previous file and code our project will be ready for us to run ESLint on it. The thing is that we don't want to run it manually to know if there are any errors, we want vscode to do it for us. To help us with that we can install the awesome ESLint extension from the marketplace.
After installing the extension, vscode will automatically load and run ESLint on our project code, awesome right?!
In addition, you can configure the extension to run linting on your code when you save the file or while you type, check out the different configuration options in the vscode settings page.
Customize
Now that we have the basic configuration setup, you can add more rules to your .eslintrc.js file to better suit your coding style and standards. You can for example enforce tabs over spaces or use single quotes instead of double quotes or even write your own rules.
Check out the ESLint rules page to learn more about the available rules and their usage.
Conclusion
Adding a linter to your tool set is a very beneficial move for both the short and long term.
I hope this small tutorial has helped you to setup basic ESLint integration because when I first came across ESLint I struggled to integrate it properly with vscode.